EVIA v1.0
WordPress Blog Theme
Latest Update: April/20/2021
Created: April/20/2021
By: Hedgehog Creative
Email: hedgehog.ask@gmail.com
Getting Started
Theme Installation
go to the topAfter you complete the purchase of the theme go to your Themeforest Profile > Downloads and locate and download the Evia Theme. Once you download the zip file, unpack it and you will see the Documentation, Demo Content and License folder and the evia.zip file, which is the theme itself.
Method 1: Wordpress Theme Manager
To install the theme go to your Wordpress Dashboard > Appearance > Themes > Add New > Upload Theme. When prompted to upload a theme, only upload the evia.zip file. Once the upload is finished, Evia theme should appear under Appearance > Themes. Hit activate and let's continue.
DO NOT upload the whole folder you downloaded from Themeforest, as that will cause errors such as - stylesheet is missing
More detailed info on how to properly install a Wordpress Theme check out Themeforest Knowledgebase Article

Method 2: FTP Upload
Another way to install a theme is to use your FTP client of choice navigate to your site and go to /wp-content/themes/ and upload a non-zipped evia.zip folder.
Plugin Installation
go to the topWhen you activate the theme you will be prompted to install and activate the required plugins.

You should install and activate the required plugins before continuing on with the theme usage, for it to function properly.
Evia comes bundled with the following plugins:
Required
- One Click Demo Import (Required)
- Evia Options (Required)
- Nifty Metaboxes (Required)
Additionally, the following plugins are recommended:
Recommended:
- Contact Form 7
- Zilla Likes
- Instagram Feed
- Mailchimp for Wordpress Lite
Import Demo Content
go to the topEvia theme comes with a prepared demo content for you to import.
NOTE: Before importing Demo content, make sure you've installed and activated all required plugins. Once done, go to Appearance > Import Demo Data. There you will have the option to import one of the pre-made demos as your starting point. You can further customize the theme through the WordPress Customizer.
NOTE: After you import this demo, you will have to setup the MailChimp Newsletter, Instagram Feed and Author Info settings separately.
NOTE: Bear in mind that any WordPress default pages, posts and widgets in the Default sidebar will remain with the demo ones added.
My Site doesn't look as the Live Preview Demo!!!
Demo content doesn't contain Author Information (Bio and social usernames) and Instagram feed info. Finally you will need to manually setup MailChimp Newsletter if you need it, see here how.
Child Theme
go to the topIf you plan on making customizations to the theme, you should consider using a Child theme to avoid the deletion of your code to the the main theme when updating.
To use a child theme upload the evia-child.zip along with the evia.zip file, and then instead of activating the main Evia theme, activate the Evia Child Theme, so now every modification you've done to the Child theme won't be deleted when updating.
More on Child Themes here
NOTE: Due to the customizing nature of the Child theme usage, support might not be provided for issues made by user error or incompatibility with the parent theme, each and every support contact should be regarding an unmodified parent Evia theme.
When done, let's go and customize this baby up :)
Updating The Theme
go to the topYou can update your theme by performing the following steps:
- Download the latest theme zip file from ThemeForest
- Extract it and locate evia.zip
- Extract evia.zip and locate the 'evia' folder
- Copy/Replace the contents of the 'evia' folder to the /wp-content/themes/evia folder of your web site.
Few Tips
go to the topOptimizing Performance
While the theme is built trying to adhere to the WordPress best practices there are some thing you can do to further optimize the performance of your site.
Of course first and foremost a good hosting provider is essential for site performance. You should look for a dedicated WP hosting packages. Along with that you should consider using some sort of Caching solution.
To speed things up on our live preview we used the WP Super Cache plugin.
If you run into issues with our themes, make sure that you caching plugins (if any) are turned off, as there are too many possible caching solutions and we can't guarantee 100% compatibility with all of them.
Regenerate Thumbnails
If you're installing a theme with images already uploaded to your server, i.e. if you're not installing our theme on a fresh Wordpress installation - you might need to install and run this WP plugin - Regenerate Thumbnails to adjust image sizes so that they are properly displayed by Evia theme. You only need to run this plugin once, afterwards any new uploaded image will be prepared automatically.
Nice Permalinks
To display nice link on your site go to Settings > Permalinks. We recommend to set your permalinks setting to "Day and Name" or "Post Name". Once you change the settings press Save Changes.
Header Setup
Menus
go to the topEvia has 2 menu locations:
- Main Menu
- Footer Nav
Main Menu
To set up a menu go to WP Dashboard > Appearance > Menus - click "create a new menu" and name it, let's say "Main Menu" as seen below.

Next select the location for the menu by selecting the Main Menu.
Now populate the menu with links as you see fit. Note that that the Main Menu should work fine with up to 4 levels of dropdown menus.

Quick tip: To add a Home page link to your menu follow these steps:

Footer Nav
To create a Footer Menu follow the same steps as above, name the menu as you wish ("Footer Menu") and select the Footer Nav as the menu position.

Note that the Footer Nav cannot have Submenus (Dropdowns) and it will show only top level links.
A more detailed look on how to use Menus can be found on the WP Codex Page
Adding a Home page Link
If you imported the content via the One Click Demo Import plugin you will notice that your Home menu link doesn't navigate to your Home page but to the Live Preview Page. To setup your own Home Link delete the existing one and follow the steps displayed in the image below.

Header Layout
go to the topEvia comes with 8 header layouts with 3 different widths: boxed, wide and full width.
To edit Header Settings go to Customizer > Header & Logo Settings > Header Layout
| Select Header Style | Choose between 10 different header layouts. If you select a Header layout with 2 rows you can select the contents of the top left and top right columns. |
| Header Top Left Column | In the left and right side of the Header top row you can choose a widget to be displayed. To set Tags and Categories go to Customizer > Header & Logo Settings > Header Tags, Categories For Subscribe Link to appear make sure you setup the Form in the MailChimp Plugin |
| Header Top Right Column | To set Tags and Categories go to Customizer > Header & Logo Settings > Header Tags, Categories For Subscribe Link to appear make sure you setup the Form in the MailChimp Plugin |
| Header Width | Set the Header width: boxed, boxed wide, full width |
NOTE:For the Subscribe Link to appear make sure to place the MailChimp Sign-Up Form to the MailChimp Form Area sidebar. This is required for the Pre-Footer Sign up from and the Subscribe Pop-up widget.

Logo
go to the topIf you wish to use a text logo go to Customizing > Typography > Text Logo to edit the font.
To use an image logo:
- Go to Customizer > Header & Logo Settings > Logo
- Under Upload Logo click "Select Image" and upload your logo image.
- Next, to upload the Retina Version of your logo click "Select Image" under Upload Retina Logo

Header Tags, Categories
go to the top
Here you can set Tags and Categories to be displayed in a Top Left and Top Right Header Columns.
Spearate each tag and category with a coma => tag, tag, tag

Navigation Settings
go to the top| Main Menu Hover Style | Set the Main Navigation hover style |
| Left and Right Margins for the Main Navigation Links | Adjust the left and right margins for the Navigation Links |
| Hide Main Menu Search Button | - |
Header Social Networks
go to the top
To setup your Social Network Links go to Customizer > General Settings > Social Networks. Once there, enter you usernames only and NOT the full url to your Social profiles. The only exceptions are the Google Plus where you need to copy and paste the entire URL to your Google+ profile page, RSS feed where you need to paste the entire url to your RSS feed and the Email Contact where you need to add your email address.
Next go to Customizer > Header & Logo Settings > Header Social Networks and check the networks you wish to display in the header.
Preload Screen
go to the topPreload screen is the white screen with the animated image that appears before the page is fully loaded, and prevents the flash of unstyled content user may experience.
If you go to Customize > General Settings > Preload Screen you can enable / disable the Preload screen
Home Page Setup
- Setting up a Homepage
- Homepage Layout
- Homepage Posts
- Homepage Featured Post Slider
- Editor Picks
- Welcome Message
- Promo Boxes
Setting up a Homepage
go to the topWhen it comes to Homepage, it can be the Blog List of your latest posts (as seen in the Live Preview) or a specific static page you created.
Homepage - Latest Posts
- Go to Dashboard > Settings > Reading
- To display latest posts on the Homepage select Front page displays : Your latest posts

Homepage - Static Page
- Go to Dashboard > Settings > Reading
- Front page displays : Static Page
- Next select a page from the dropdown menu you wish to make a Front (Home) page
- Then select a page from the dropdown menu you wish to make a Posts (Blog) page
Homepage Layout
go to the topThere are 11 different Homepage Layouts to choose from:
- Standard Layout (Default)
- List Layout
- Grid 2 Columns Layout
- Standard + Grid Layout 1-2-2-2 (first standard post, then grid posts)
- Standard + Grid Layout 1-2-1-2 (alternates between Standard and Grid posts, starting with Standard)
- Standard + List Layout 1-2-2-2 (first standard post, then list posts)
- Standard + List Layout 1-2-1-2 (alternates between Standard and List posts, starting with Standard)
- List + Grid Layout 1-2-1-2 (alternates between List and Grid posts, starting with List)
- Grid + List Layout 1-2-1-2 (alternates between Grid and List posts, starting with Grid)
- ZigZag Layout
- ZigZag + Grid Layout
To choose a layout go to Customizer > Home Page Settings > Blog Layout and select the desired layout. Next, you can select the Home page Sidebar Position (left, right or none). Additionally, you can select which Sidebar to assign to the Home Page from the dropdown menu under SELECT BLOG HOME SIDEBAR
| Excerpt Type | Choose to show post Excerpt, Full Content (cut off at the read more line) or choose None to hide it altogether. NOTE: Only the Standard Post layout will accept the Full Content Excerpt, Grid, and List will default to Excpert or None (if selected). |
| Select Blog Home Layout | Select the Home page layout |
| Select Sidebar Position | Select the Sidebar Position for the Home Page |
| Select Blog Home Sidebar | - |
| Set the order of the Homepage sections | Set the order of the Homepage sections: Welcome Section, Intro Posts, Promo Boxes. Even though you can set the visibility by clicking on the eye icon, make sure that the sections are set to Show in their each respectable settings section. |
Homepage Posts
go to the topCategories
You can select from which categories you wish to display posts on the Homepage.
To choose categories go to Customizer > Home Page Settings > Posts To Display and under BLOG HOME CATEGORIES select the desired categories. You can hold Ctrl + Click (Cmd + Click on Mac ) to select multiple categories.
Pagination
You can also, select your preferred pagination style by choosing between Older/Newer Posts or Numbered Pagination.

Homepage Featured Post Slider
go to the topTo activate a Featured Post Slider make sure that all Posts you want to Feature have Featured thumbnail images and that the Featured option is selected for those Posts. Additionally you may choose to show posts from a certain Category (these don't need to be set as featured).
More on the Featured Slider over here
Editor Picks
go to the top
For a Post to be shown you must check the Editor Picks meta box setting on the Edit Post page as seen here:

To enter the Title and Description for the Editor's Picks section go to Customizer > Home Page Settings > Editor Picks
| Show Editor Picks | Show / Hide Editor Picks on the Homepage |
| Where to display Editor's Picks | Show Editor's Picks before the Footer only on the homepage or on all pages. |
| Title for the Editor Picks Section | Enter a title for the Editor Picks Section |
| Editor Picks Text | Enter a title for the Editor Picks Section |
| Number of Editor Picked Posts to show | Set the number of Editor Picks posts to be shown. If above 4 they will be shown in a carousel slider form. |
Welcome Message
go to the top
To edit the Welcome Message go to Customizer > Home Page Settings > Welcome Message.
Setting there are pretty self-explanatory. Once you edit them click Save.
| Show Welcome Message | Check to enable the Welcome Message on the Homepage |
| Welcome Background Rectangle Color | Set the color of the background rectangle shape. |
| Welcome Message Title | Enter the title for the Welcome Message section |
| Welcome Message Text | Enter the text for the Welcome Message section |
| Welcome Message URL Text | Enter the Text for the Welcome Message Call-To-Action button |
| Welcome Message Image | Upload the Main Image for the Welcome Section. Make sure that the image is about 400px wide |
| Show Welcome Image Background Shapes | If you upload a transparent Welcome Image you can show various shapes behind it, and change their colors below. |
| BG Accent Color | Background Shapes accent color |
| BG Secondary Color | Background Shapes secondary color |
Promo Boxes
go to the top
To set up Promo Boxes go to Customizer > Home Page Settings > Promo Boxes. There you can either Disable them or select to show 3 or 4 boxes above the Home page blog roll (you can select to show them on every page of the blog roll). Additionally you can set the height of the Boxes in pixels (px).
Setting there are pretty self-explanatory. Once you edit them click Save.
To set up individual Boxes do:
- Step 1: Enter The Title
- Step 2: Enter the Box URL and make sure to put http:// before the url.
- Step 3: Select or upload an image. The image height should correspond to the Box height you set and the width of thew image should be at least 760px

Intro Posts
go to the top
To set the Intro Posts go to Customizer > Home Page Settings > Intro Posts.
Setting there are pretty self-explanatory. Once you edit them click Save.
| Show Intro Posts | Check to enable the Intro Posts on the Homepage |
| Title for the Intro Posts Section | Enter the title for the Intro Posts section |
| Welcome Message Text | Enter the text for the Welcome Message section |
| Enter Post IDs you want to display (3 posts only) | Enter Post IDs of the posts you want displayed separated by a comma i.e 23,45,56. Leave empty to load Posts from the category selected below. |
| Offset the start of Posts | If you're displaying posts from the Categories, you can set the offset number, so that the posts skip that many posts in query. |
| Intro Posts Categories | Pull Posts from selected Categories. Make sure to leave the Posts Ids field empty. |
| Intro Posts Color | - |
Recommended Posts
go to the top
To set the Recommended Posts go to Customizer > Home Page Settings > Recommended Posts.
Setting there are pretty self-explanatory. Once you edit them click Save.
| Show Recommended Posts | Check to enable the Recommended Posts on the Homepage |
| Title for the Recommended Posts Section | Enter the title for the Recommended Posts section |
| Welcome Message Text | Enter the text for the Welcome Message section |
| Enter Post IDs you want to display (add at least 4 posts) | Enter Post IDs of the posts you want displayed separated by a comma i.e 23,45,56. Leave empty to load Posts from the category selected below. |
| Offset the start of Posts | If you're displaying posts from the Categories, you can set the offset number, so that the posts skip that many posts in query. |
| Recommended Posts Categories | Pull Posts from selected Categories. Make sure to leave the Posts Ids field empty. |
| Recommended Posts Color | - |
Posts
- Posts Overview
- Post Customizer Settings
- Post Individual Options (Nifty Metaboxes)
- Post Author Information
- Post Likes (Zilla Likes)
Posts Overview
go to the topThe Heart and Soul of every Blog Theme are the Posts, so let's have a look with what we are working here.
Evia supports the following Post Formats:
- Standard (Default)
- Gallery
- Video - embed
- Audio - embed
When writing a Post you can select a Post Format here:

Post Anatomy

- Post Thumbnail / Featured Image
- Categories
- Post Title
- Post Meta (Author, Date, Read Time)
- Post Excerpt
- Read More Link
- Share Post
- Likes Count
- Sticky post Icon
Setting the Featured Image
Each Post Format supports Featured Image to be set. To do it go here:
NOTE: Make sure to upload a Featured Image for every Post and every Post Format including Video, Audio and Gallery Formats, because Featured Images are used for displaying Posts in Featured Sliders and Latest / Related Post carousels. If the Post doesn't have a Featured image it won't be displayed in Featured Post Sliders.

NOTE: If you wish to use the Full Width Featured Slider make sure your Post Featured Thumbnails are at least 2000px wide to facilitate the slider width. If you don't use the Full Width Slider then your image need not be larger than 945px in width, in order to save bandwidth.
Post Excerpt
To create an excerpt in the the Standard Blog List view, when creatimg the content click where you want to cut off and click the "Insert Read More Tag" button and a -----Read More----- line should appear. List, and Grid Posts use auto excerpt.
Post Customizer Settings
go to the topFrom the WP Customizer you can make changes to Posts which have a global effect, meaning that those changes affect every Post on the Site. However, many of those settings can be Overridden on the Post by Post basis in the Post Edit page, under the Post Options (see below)
Ok, so let's take a look at the Customizer Post Settings:
Post General Settings
| Single Post Title Position | Place the Post Header before or after the Featured Image or you can Hide the Featured Image all together. Only for the Single Post pages. |
| Center Align Post Header | By Default the Post Header is centrally aligned. Disable this align it to the left. This is not applicable to the List Post Layout. |
| Enable Post Sharing | This will display the Share social icons in the post footer |
| Enable Sticky Post Sharing | This will display the Share social icons fixed on the left side of the screen. |
| Post Elements | Hide or Show different parts of the Post |
| Next / Prev Post | Hide The Post Navigation for the Next and Previous Post after the Post content |
Post Styles
| Post Title Hover Style | Set the look of the Post Title Hover. Choices: None, Underline, Link Color |
| Post Category Style | Set the look of the Post category meta. Choices: Text only, Background Color, Background Color with shadow |
| Post Title Hover Color | Set the color of the Post Title Hover effect. |
| Post Category Color | Set the color of the Post category meta. |
| Post Category Background Color | Set the highlight / background color of the Post category meta. |
Post Author Section
| Post Author Box | Show the Post Author info after the Post Content. |
| Hide Author Social | Show/Hide author social networks icons |
Related Posts
Related posts are located under the Post Author Box. You can choose the number of Related Posts and whether to display or hide Related Posts on every Single Post Page through Customizer or on the Post by Post basis through Post Options (Post Metaboxes)

Single Post Page Layout
To change the Single Post Page Layout go to Customizer > Page Settings > Page Layout Options
and under the first set of options you'll see Single Post Layout.
Here you can the assign Sidebars and change Sidebar Position for all Posts. To assign a Sidebar select one from the dropdown menu. Make sure you put some Widgets in the selected Sidebar by going to Appearance > Widgets in order for the Sidebar to appear.

Post Individual Options (Nifty Metaboxes)
go to the topWhen writing a Post, and providing that you installed and activated the Nifty Metaboxes plugin, you should see a Post Options Panel underneath the Post Text Editor. A snapshot:

Post Options are divided in three parts. Featured Posts and Editor's Picks Options, Banner Ads Settings and Override Global Post Settings. Let's break it down.
Featured Post Options

To display the Post in the Featured Post Slider check the Featured field.
Editor's Pick Post Options

To display the Post in the Featured Post Slider check the Featured field.
Override Global Post Settings

Here, by selecting Override Global Post Settings you can override some of the changes you've made in the WP Customizer under Post Settings.
Since the settings are pretty much the same, I won't be going over them again, so refer to the Customizer section to see what each of the settings do, although they are pretty self-explanatory.
In addition, here you can assign a different Sidebar (10 to choose from) to each of the Posts as well as the layout of the Single Post Page
Additionally, you can add Banners and Ads here, on a Post by Post basis. More on that here Banners and Ads
Post Author Information
go to the topPost Author Information is used by the Evia theme in a couple of places. In the Post Author Info Box after the Post Content in the Single Post Page and in the Evia: Author Widget.

Author Information can be entered by going to Dashboard > Users > All Users Select the User you want to edit (in this example it will be admin). There you will see a list of option. I will go through the ones needed for the Author Box and Author Widget to display properly.

| Display name publicly as | This name will be displayed as the author name throughout the theme |
| E-mail (required) | Your email address. The theme supports Gravatar images, and this email address will be associated with the Gravatar account if one available. |
| Author Profession | Used in the Author Widget, under the author name |
| Social Networks Usernames | Enter the Social Networks usernames for them to appear in the Author Info Box. |
Post Likes (Zilla Likes)
go to the topTheme comes with the support for ZillaLikes which is one of the recommended plugins prompted for installation.
To disable ZillaLikes from your Posts just deactivate the plugin by going to Plugins > Installed Plugins find ZillaLike and click on deactivate, or go to WP Customizer > Post Settings > Post General Settings - Post Elements and check Disable Likes in Post Footer
Post Formats
Standard Post - Default
go to the topFirst Post Format is the Standard (Default) Format and is pretty straightforward.
Gallery Post Format
go to the topTo create a Gallery Post follow these steps:
- Click on Gallery Format
- Then Pick Images
- Next select multiple images by holding Ctrl (Cmd on Mac) and clicking.
- Don't Forget to set the Featured Image as well, for other post views (in sliders)


NOTE: If you're using the Gutenberg Post Editor, when creating a new Post and you select the Gallery Post Format from the dropdown menu, it will automatically add a Gallery Block to your Post Content. Delete that Gallery Block and use the Gallery Post Options provided by the theme for creating the Gallery Slideshow.

Video and Audio Post Format
go to the topVideo and Audio Post Formats, selected by clicking the corresponding links, work in pretty much the same way as they use WordPress' oEmbed technology for displaying embedded video and audio. All you need to do is to see if WordPress natively supports the site hosting the file and place the url in to oEmbed field as seen below.
More on oEmbed and WordPress on Embeds WP Codex page


NOTE: Video and Audio Embeds will be displayed on the Blog Home page only if Standard, Standard + Grid Layouts are selected, otherwise Featured image will appear instead of a Video/Audio.
NOTE: If you're using the Gutenberg Post Editor, when creating a new Post and you select the Video or Audio Post Format from the dropdown menu, it will automatically add a Video / Audio Block to your Post Content. Delete that Video / Audio Block and use the Video / Audio Post Options provided by the theme.


NOTE: Make sure to upload a Featured Image for every Post and every Post Format including Video, Audio and Gallery Formats, because Featured Images are used for displaying Posts in Featured Sliders and Latest / Related Post carousels. If the Post doesn't have a Featured image it won't be displayed in Featured Post Sliders.
Pages
Pages Overview
go to the top- To create a Page go to Dashboard > Pages > Add New
- Enter the Page Title - which will appear at the top of the Page (you can give it another title in the Page Settings below). Page title will be displayed in the Main Menu should you put a link to it.
- Once you created a Page let's see what Page Settings are available in the Customizer and Page Metaboxes
Page Settings
go to the topFirst off let's see the Global Page Settings which can be found in the WP Customizer > Page Settings
NOTE: Many of those settings can be Overridden on the Page by Page basis in the Page Edit screen, under the Page Settings
Page Title Options
These Settings affect every Page on the site, unless you Override them in the Edit Page screen.
| Page Title Font Size | As the name suggests - adjust the Font Size of the Page Title |
| Page Subtitle Color | Change the color of the Page Subtitle |
| Hide Components | Hide the Page title |
Page Layout Options
Here you can set the layout for different pages on the site - the Sidebar Position and which Sidebar to display.
| Single Post Layout | Set the Layout of the Single Post pages and assign a Sidebar to be displayed. |
| Standard Page Layout | Set the Layout of the Standard Pages you would create in Dashboard and assign a Sidebar to be displayed. |
| Archive Page Layout | Set the Layout of the Archive Pages (Categories, Tags, Date, Author's Posts, etc) you would create in Dashboard and assign a Sidebar to be displayed. |
| Author Page Layout | Set the Layout of the Author Page which lists author's posts and assign a Sidebar to be displayed. |
| Search Page Layout | Set the Layout of the Search Page you would create in Dashboard and assign a Sidebar to be displayed. |
| 404 Page Layout | Set the Layout of the 404 Page you would create in Dashboard and assign a Sidebar to be displayed. |
Edit Page Settings (Nifty Metaboxes)
On the Edit Page screen you will see the following options under Page Settings
| Page Title | Displayed at the top of the page. If left empty, page name will be used. |
| Page Subtitle | Displayed as small text above the Page Title. If left empty, nothing will show. |
Overriding Settings (Nifty Metaboxes)
| Override Global Page Settings | When selected all the setting below will come in to effect and override the Customizer Settings. |
| Hide Page Title | This will hide the Page Title on this page. |
| Choose a Sidebar | Select a sidebar to display on this page. |
| Select Sidebar Position | Select the Layout of this Page |
Off-Canvas Sidebar
Off-Canvas Settings
go to the topTo configure Off-Canvas Sidebar go to Customize > Off-Canvas Setting
| Show Off-Canvas Logo | Check to enable the Off-Canvas Logo (before the widgets) |
| Choose Logo to use or upload one below | Check to use the main logo uploaded at the Customizer > Header & Logo Settings > Logo |
| Off-Canvas Sidebar Logo | Upload a default size logo |
| Off-Canvas Sidebar Logo - Retina | Upload a logo for retina devices |
Featured Post Sliders
Sliders Overview
go to the topFeatured Posts Sliders allow you to showcase Featured Posts or Latest Posts from selected categories on your Homepage or any other Standard page.
Classic Slider

Slanted Edges Slider

Modern Slider

To select a Featured Posts Slider to be displayed on the Homepage go to Customizer > Home Page Settings > Featured Slider.
NOTE: In order for a Post to be displayed in the Slider, you need to set a Featured Image for that post, otherwise the Post won't be shown regardless if it was selected as a Featured Post
Slider Settings
go to the topTo edit Slider Settings go to Customizer > Slider Settings
| Homepage Slider | Enable the Featured Posts Slider. Choices: Stylish Slider, Transparent Slider, Classic Slider, Multi Post 1 Slider, Multi Post 2 Slider |
| Slider Style | Choose the style for the Slide Post Content Choices: Classic, Slanted Edges and Modern |
| Slider Post Title Text Shadow | Adds a text shadow to the Post title. Recommende for the Classic slider. |
| Slider Width | Select the Slider Width Choices: Boxed, Wide, Full Width Applicable only to the Classic and Slanted Edges Slider |
| Boxed slider - show prev and next slide | Only for Classic and Slanted Edges Slider Enable to see parts of the previous and next slide. |
| Slider Display | Display Slider on every Page of the Blog |
| Posts to Display | Which Posts to show in slider - Featured Posts or Latest from Categories |
| Select Categories | Select Categories to show Posts from. CTRL + Click (Cmd + Click on Mac) to select multiple categories or leave empty for "all categories" |
| Number of Posts | Number of posts to be displayed in slider. NOTE that this is the number of posts that will be pulled from the database, if some of those posts miss the featured image, they won't be displayed but they will be counted towards the total of posts pulled. |
| Transition Speed | Sets the transition speed |
| Slider Autoplay | Slides transition automatically upon page load |
| Pause Between Transitions | Pause between slides if autoplay is on. In milliseconds (1000 ms = 1 s) |
| Hide Slide Elements | Hide / Show different Elements in Post slides |
Social Networks - Instagram Setup
Social Networks Usernames
go to the top
To setup your Social Network Links go to Customizer > General Settings > Social Networks Usernames. Once there, enter you usernames only and NOT the full url to your Social profiles.The only exceptions is the RSS feed where you need to paste the entire url to your RSS feed.
Once you set up your Social Profile links you can use them in the Footer Social section (see here) and in the Evia: Social Widget (see here)
Instagram Setup
go to the top
Follow these steps to enable Instagram Feed on your site:
1. Install and activate the recommended Smash Balloon Instagram Feed (Smash Balloon Social Photo Feed) plugin
2. Go to Dashboard > Instagram Feed and under Configure click on "Connect an Instagram Account" and follow the steps.

It will prompt you to login and then authorize the plugin


If successfully connected you should see your account name in green as seen here:

Finally to enable it go to Customizer > Footer > Instagram Footer and click on

Here make sure to enter the same username used for the Instagram Feed, as it will be used to create a follow me url to your profile.
Additionally, you can set the Instagram Feed Background Color here.
If you get an Instagram Connection Error then go to this page to connect your account
Setting up the Feed to fit the Evia design
Go to Dashboard > Instagram Feed > Customize

Set the Padding around images to 0 or leave it empty

Uncheck the "Show Feed Header", "Show Load More Button" and "Follow Button"


Lastly go to Evia Options > Instagram Feed and enter your username and check "Show Theme's Default Follow Button"

Banners
Banner Locations
go to the topThe theme allows you to upload simple banners in several different locations which you can see in the example below:

To add banners go to Dashboard > Evia Options > Banner (Ads) Settings. There you can choose to setup the Site Wide banners which will appear on every page, Post Banners which will appear on every Single Post page, and Page Banner which will appear on all Pages. After entering the fields make sure to press Save Changes before going to a different tab.
In the individual Post and Page edit screens you can add additional Banners which will override the global ones added in the Banner (Ads) Settings
Note that for the Banner to appear you must both enter a valid URL and select an image.
Recommended Banner Widths:
| Header Banner | 768px |
| Before Header Banner | 1140px |
| After Header Banner | 1140px |
| Before Footer Banner | 1140px |
| Before Post Banner | 1140px |
| After Post Banner - No Sidebar | 945px |
| After Post Banner - With Sidebar | 832px |
| Before Post Content Banner - No Sidebar | 756px |
| Before Post Content Banner - With Sidebar | 666px |
| Before Content Page Banner - No Sidebar | 945px |
| Before Content Page Banner - With Sidebar | 832px |
Footer
Footer Columns
go to the top
To setup the Footer, first we need to populate it with Widgets so head over to Appearance > Widgets. There you will see a list of available Widgets on the left side and on the right a list of available Widget Areas (Sidebars). There are 3 Footer widget areas:
- Footer 2 columns - which can hold up to 2 widgets per row
- Footer 3 columns - which can hold up to 3 widgets per row
- Footer 4 columns - which can hold up to 4 widgets per row

When you fill the Footer Widget Area with Widgets it should look something like this:

Now head over to the Customizer > Footer > Footer Columns > and select which area you wish to display. Note that if you select a Footer Widget Area and it has no Widgets in ti it won't appear on the page.
Footer Settings
go to the topOther Footer Settings can be found in Customizer > Footer
| Footer Columns | Select the number of columns in the Footer. Make sure to populate the appropriate Footer Widget Areas in Appearance > Widgets |
| Footer Social Networks | Select social networks to be displayed in the footer social section.You can hide the icons and just show the Network names. NOTE: If you haven't entered the username for the network you selected, it won't show up. |
| Footer Instagram Feed | Enable Instagram Feed. Make sure to first configure the Instagram Settings by going to the Admin Dashboard > Settings > Instagram Settings. |
| Copyright Text | Enter your own copyright text to be shown in the bottom left of the Footer. |
Widget Areas
- Widget Areas - Sidebars
- About Widget
- Advertisement Widget
- Author Widget
- Post Slideshow Widget
- Post List Widget
- Social Widget
- Widget Styles
- Subscribe Widget
Widget Areas - Sidebars
go to the top
Evia theme comes with 15 Predefined Widgetized Areas - 3 of which are used in the Footer and others on Pages as Sidebars.
- Default Sidebar
- Default Theme Sidebar - Automatically active if you import theme's demo data
- Off-Canvas Sidebar (Sidedrawer) - Hidden sidebar which is trigger when clicked on the bars icon
- Mailchimp Form Area - Widget area for displaying the MailChimp Newsletter form above the Footer
- Footer Columns 2
- Footer Columns 3
- Footer Columns 4
- Custom Sidebar 2 - 10
To use a Sidebar, you need to place some Widgets in it. Once you fill it with Widgets, you then must assign a Sidebar to a Page or a Post. On assigning Sidebar to Pages check here and on assigning to Posts check here

Evia Widgets
Evia theme comes with 6 custom Widgets for you to use. In order to activate them make sure you install the Evia Options Plugin
List of Widgets:

- Subscribe Widget
- Advertisement
- About Widget
- Author Widget
- Post Slideshow
- Post List
- Social Widget
About Widget
go to the top
| Title | Enter Widget title here |
| About me text | Enter a brief text about you or your company/agency/site |
| Logo Image From The Customizer | By checking this option Logo image you uploaded through Customizer will be used in the Widget |
| Upload a Different Logo Image | Add new or select an existing image for the widget logo for standard and retina displays. |
Advertisement Widget
go to the top
| URL | URL of your advert. |
| Image | Image for the Ad to be clicked on |
Author Widget
go to the topAuthor Widget is a stylish way to present yourself along the Content on your site. To setup the Author Widget you need to have Users with Author roles on your site. What are Users and Roles check here
On how to setup Author User Profile read here.

| Title | Enter Widget title here |
| Link Text | Enter a link text as in "Read more" or "More about the author" |
| Select a Page to Link to | Select a Page for the above Link to link to. By default it is set to List of Author's Posts but you can assign any page. |
| Author Widget Image | Upload an Author Image. Image should have a width of at least 360px. |
| Author Retina Widget Image | Upload Retina Author Image. |
Post Slideshow Widget
go to the topPost Slideshow Widget allows you to display Latest Posts in a Slideshow which you can add in the Footer or in the Sidebar. You can also display only one Latest Post by selecting Display only one Post.

| Title | Enter Widget title here |
| Select Category | Select a Category to show Latest posts from or choose to show posts from all categories. |
| Select Display Type | Choose to show Single Latest Post or A Slideshow of Latest Posts |
| Number of Posts | Set the number of posts to show in slider (same restrictions apply as for the Featured Sliders regarding Featured images) |
| Enable Autoplay |
Post List Widget
go to the top
| Title | Enter Widget title here |
| Select Category | Select a Category to show Recent posts from or choose to show posts from all categories. |
| Number of Posts | Set the number of posts to be displayed. |
Social Networks Widget
go to the topDisplay social links in the Sidebar or Footer. You can show the Social Profiles you entered in Customizer > General Settings > Social Networks or you can select specific networks to show up. Note that if you haven't entered a username (in Genereal Setting) the social icon will not appear.

| Title | Enter Widget title here |
| Simple Message | Short message to be shown above the Social Icons |
| Social Networks from the Customizer | Show the Social Networks from the Customizer to which you added usernames to. |
| Select Social Networks | Select Social Networks to be displayed. (Don't forget to add usernames in Customizer > General Settings > Social Networks) |
Widget Styles
go to the top
Evia theme comes with 3 Predefined Widget Styles for Widget Titles. You can additionally set the color and text alignment.
To switch between styles and to further customize Font Size and Style of the Widget Title go to WP Customizer > Colors & Styles > Widget Title
Subscribe Widget
go to the top
Make sure to have MailChimp plugin active and the Newsletter form configured - See here.
NOTE: Make sure to place the MailChimp Sign-Up Form to the MailChimp Form Area sidebar. This is required for the Pre-Footer Sign up from and the Subscribe Pop-up widget.
| Title | Enter Widget title here |
| Subscribe button text | - |
Contact Form and Newsletter (Mailchimp) Setup
Contact Form
go to the topFor the Contact Form Evia uses Contact Form 7 plugin, so make sure you install it when activating the theme.
Once you activate the Contact Form 7 plugin go to Contact > Add New Form.
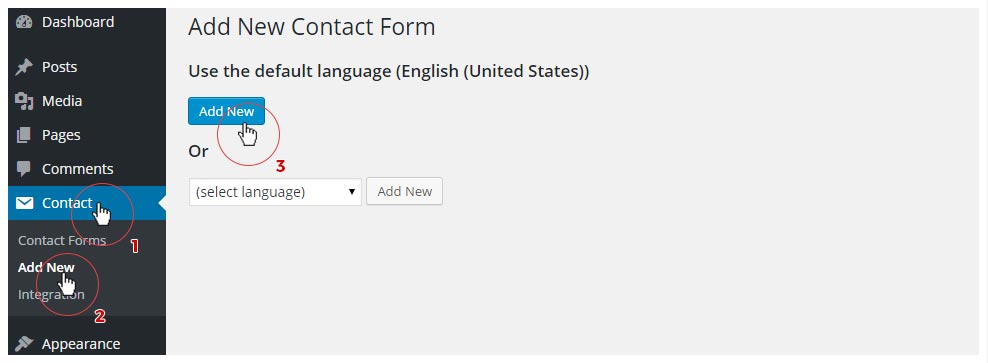
Give it a name and then copy the code below used in the Live Preview and paste it into the Contact Form field.

<p>Your Name (required)<br />
    [text* your-name] </p>

<p>Your Email (required)<br />
    [email* your-email] </p>

<p>Subject<br />
    [text your-subject] </p>

<p>Your Message<br />
    [textarea your-message] </p>

<p>This form collects your name and email so that we can correspond with you. Check out our policy for more information.
</p>

[checkbox* checkbox-618 "I consent to having this website collect my name and email."]

<p>[submit "Send Message"]</p>
Next click on Mail tab and in To field enter your email address. Go through other fields and fill them as you see fit. To see how to further customize Contact Form using CF 7 see their Documentation here

When you fill all the fields hit save. Now copy the Shortcode you received and go to Pages > Add New Page to create a new page which will be our Contact Page. Once created, paste the shortcode you copied and paste in the Content Editor


Contact Form 7 has many other settings, but for starters we recommend that you begin with the Evia default form. As Contact Form 7 is a third party plugin, Support for contact form issues should be handled through this page: Contact Form 7. To see Contact Form 7 documentation visit this page
Newsletter - Mailchimp Integration
go to the topEvia theme has support for the Mailchimp Newsletter Integration with the help of Mailchimp For Wordpress Lite plugin. Here are the necessary steps to create a Mailchimp subscribe form.
Ok, first and foremost you must have a Mailchimp account (well, obviously). Secondly you need to install and activate the Mailchimp For Wordpress Lite plugin, which you will be prompted to do when you activate the Evia theme. Once all that is taken care of proceed with the steps below.
1) To use the plugin, you need to obtain your Mailchimp API key. To do that go to Mailchimp for WP > Mailchimp and click on Get your API key here.

2) Log in and if prompted with the We need some security information screen proceed by clicking I'll do this later

3) On the next screen click on Create A Key and then copy it and return to the WP admin and to the Mailchimp for WP > Mailchimp

4) Paste the API key in the API key field and press Save Changes. If all went well Status should say CONNECTED.

5) Now to prepare the Newsletter form. Go to Mailchimp for WP > Forms. There are a couple of things we need to do here.
- First Load form Styles (CSS)? set to No
- Check the Subcriber Lists you wish the Form to link to.
- Next copy and paste this Form code in the Form Mark-up Field (The on used in the Live Preview).
<div class="newsletter-content"> <h3 class="newsletter-title">Never Miss A Thing!</h3> <p class="newsletter-message">Subscribe to our newsletter and stay updated to our offers and deals!</p> <div class="zigzag-svg"><svg xmlns="http://www.w3.org/2000/svg" xmlns:xlink="http://www.w3.org/1999/xlink" preserveAspectRatio="xMidYMid" width="52" height="7" viewBox="0 0 52 7"> <path d="M46.000,7.000 L41.000,2.252 L36.000,7.000 L31.000,2.252 L26.000,7.000 L21.000,2.252 L16.000,7.000 L11.000,2.252 L6.000,7.000 L0.000,1.303 L1.354,-0.000 L6.000,4.412 L10.646,-0.000 L11.000,0.340 L11.354,-0.000 L16.000,4.412 L20.646,-0.000 L21.000,0.340 L21.354,-0.000 L26.000,4.412 L30.646,-0.000 L31.000,0.340 L31.354,-0.000 L36.000,4.412 L40.646,-0.000 L41.000,0.340 L41.354,-0.000 L46.000,4.412 L50.646,-0.000 L52.000,1.303 L46.000,7.000 Z" class="cls-1"/> </svg></div><!-- end slide-svg --> </div> <div class="newsletter-inputs-outer"> <input type="email" class="newsletter-field" name="EMAIL" placeholder="Your email address" required /> <input class="newsletter-button" type="submit" value="Subscribe" /> <div class="newsletter-agree"> <label> <input name="AGREE_TO_TERMS" type="checkbox" value="1" required="">I have read and agree to the terms & conditions </label> </div> </div> - Press Save Changes.

6) When done go to Appearance > Widgets. Now you have an option to display the Newsletter Sign Up Form in the Sidebar / Footer or in the special MailChimp Form Widgetized Area above the Footer. Drag and drop the Mailchimp Sign-up Form widget in the Sidebar you wish to use and enter the name for the Widget. Press Save.

7) Depending on where you placed the MailChimp Widget the final result should look like this.


8) Additionally, you can set Checkboxes in your Post Comment Form to subscribe to the Newsletter Lists. Example:

To set it up follow these steps:
- Go to Mailchimp for WP > Integrations.
- Nest, go to Comment Form under Available integrations
- Click Yes for Enabled?
- Check the Subcriber Lists you wish the Form to link to.
- Load some Default CSS? set to No
- Press Save Changes

Mailchimp For Wordpress Lite has many other settings, but for starters we recommend that you begin with the Evia default form. As Mailchimp For Wordpress Lite is a third party plugin, Support for Subscribe Form issues should be handled through this page: Mailchimp For WP Support. To see Mailchimp For WP documentation visit this page
NOTE: If you import demo content and don't see the Newsletter Forms go to Dashboard > Mailchimp for WP > Forms and press Save Changes as seen below.

Typography and Styling
Typography
go to the topNote that some fonts are bigger than others so you'll want to change the font size to adjust to the differences in size, especially with the really large Font sizes in Sliders and Page Titles and the really small font sizes.
Typography Sections
| Main Font | Here you can set the Body Font, Primary - Headings Font and a Secondary - Quotes Font. You can later assign these fonts to different elements by goung to Typography > Nav, Widgets, Section Title |
| Body & H1 - H6 Font Sizes | As the title suggests, here you can adjust the font size of the Body text and the Headings. |
| Logo Font | Lets you assign a font to the textual Logo and set additional font properties. |
| Post Title Font Settings | Adjust the font-size, font-weight, text-transform and the letter-spacing of the Post Title |
| Featured Post Title Font Setting | Assign the Font Family and adjust the font-size, font-weight, text-transform and the letter-spacing of the Title for each of the available Featured Sliders |
| Nav, Widgets, Section Title | Here you can adjust the font settings for:
|
NOTE: Even though you have the option to select Font families for many different elements, we recommend that you don't include more than 3 different Font Families as that can slow down the loading of your site.
The best way to get the desired look and feel is to play around with the Typography options and see which settings look best to you.
Custom Styling
go to the topColors
By going to Customizer > Colors & Styles you can change the colors and styles of different elements around the theme.
WooCommerce - Shop
Installing WooCommerce
go to the topIMPORTANT: DO NOT IMPORT WooCommerce dummy Products before you install and activate the WooCommerce Plugin. We recommend that you first import a theme demo, install and activate the plugins and then import the products
To start using WooCommerce, first you must install the WooCommerce Plugin from the WordPress plugin repository. In your Dashboard go to Plugins > Add New > Search for WooCommerce Plugin and Install and Activate it.
Once you activate the WooCommerce plugin, the Setup Wizard will run. You can either go through the wizard or skip it. To learn more on how to configure the wizard we recommend you see the instructions here WooCommerce Setup Wizard
NOTE: When running the Wizard make sure you don't install and activate the Storefront theme that is offered by the WooCommerce plugin.

When you're done with the Wizard it should have created the necessary shop pages for you. To see go to your Dashboard > Pages and you should have the following pages that look like this:

If you don't have the pages and their assigned roles then go to WooCommerce > Status > Tool > Create Pages as seen below:

Import Demo Products
go to the topTo import dummy products go to Dashboard > Tools > Import and select the WooCommerce Products CSV - Run Importer

Click on Choose File and navigate to the theme folder you downloaded and go to evia > inc > demo > products.csv. Select the products.csv


Continue. A Column Mapping screen appears. Scroll down and Run the Importer.


Once done go to Products.

Customizer Settings
go to the top| Hide Components | Hide "add to cart" button and/or the rating stars on the main shop page |
| Shop Page Layout | Select the number of columns for the main shop page - 2, 3 or 4 columns |
| Number of products per page | As the title suggest assigns the number of products per page. If left blank it will default to the number of posts per page. |
| Shop Page Layout | Select the layout of the main shop page and assign a sidebar to be displayed. |
| Product Page Layout | Select the layout of the Product page and assign a sidebar to be displayed. |
To change the layouts of the Cart, Checkout and Account pages, go to Dashboard > Pages and choose the page you want to edit, then below check the "Override Customizer Settings" and pick and choose layouts and sidebars for the corresponding pages.
To learn how to use WooCommerce we recommend that you go to their site here - WooCommerce Docs
Theme Text and Translation
Default Theme Text
go to the topIf you wish to change the Default Theme strings (text) such as "Continue Reading" or "Next Post", "Older Posts" but don't want to translate the theme then you can do that by going to Appearance > Default Text Settings. Here you can change a variety of words and sentences which are usually hard coded into a theme.
If you still wish to translate the theme, then see the following section regarding translation.
Translation
go to the topEvia theme is ready for translation. In the download package, you can find an example .po and .mo translation files, which you can use as a starting point. The theme also comes with the evia.POT file to create new translation .po files.
But before you start translating make sure you go to Customizer > General Settings > Enable Translation and click on Enable Translation. This will allow the translation of the Theme's default text via .PO and .MO files. If left unchecked the text you entered in the Default Text option will remain displayed.

In order to create your own translation, you only need to download Poedit (or similar application) and follow this simple instructions.
In the theme folder, inside the languages folder, you will find a file called evia.pot. Open that file using Poedit. You will find a screen like this one:

Just replace each string with your new translated one, and save the file using your language-country code. In case you do not know which is your code, search it here.
To change the language of your site go to Settings > General > Site Language. Note: In any case that the language that you need is not available in the above option, please refer to installing the language files manually.
For WorPress versions 3.9.2 and below follow the following steps to change the Site's language.
Open the file wp-config.php at the root of your WordPress website. Search for the PHP code: define ('WPLANG', ''); and replace it with define ('WPLANG', 'de_DE');
You will probably want to replace the German language code with your own one.
You can read more about translating Wordpress in this guide.
IMPORTANT: Once again, before you start translating make sure you go to Customizer > General Settings > Enable Translation and click on Enable Translation. This will allow the translation of the Theme's default text via .PO and .MO files. If left unchecked the text you entered in the Default Text option will remain displayed.
Credits
I've used the following images, icons or other files as listed.
- One Click Demo Import
- Slick Slider
- Perfect Scrollbar jQuery plugin
- SlickNav Responsive Mobile Menu v1.0.3
- FitVids 1.1
- Modernizr Plugin
- Nivo Lightbox plugin
- Font Icons from Fontello
- Google Web Fonts
- Images from Unsplash.com and Pexels.com under Creative Commons Public Domain License
- Support for Contact Form 7
- Support for Mailchimp for WP Lite
Changelog
Version 1.0 - 07.10.2020.
-- Initial release